Orthognathic surgery involves the surgical manipulation of the elements of the facial skeleton to restore the proper anatomic and functional relationship in patients with dentofacial skeletal anomalies.
This article provides an overview of the principles used in orthognathic surgery, which can be used to manage a broad spectrum of maxillofacial abnormalities, including congenital, developmental, and acquired deformities.
Epidemiology
Frequency
The exact incidence of dentofacial deformities requiring orthognathic surgery is difficult to estimate because it includes a broad population of patients with deformities of congenital, developmental, and traumatic origin. However, the number of individuals with developmental dentofacial deformities in the United States who may benefit from orthognathic surgery is estimated at 1.5–2 million; of these, approximately 1 million present with Class II deformities and 0.5 million with Class III deformities. In other regions of the world, the distribution among these classes seems to vary.
Etiology
Dentofacial skeletal anomalies generally occur as a result of a differential in growth of the upper facial skeleton to the lower facial skeleton, resulting in discrepancy of the normal relationship that exists between the upper and lower jaw. Underlying genetic predisposition and acquired causes can influence the normal growth of the facial skeleton. Congenital anomalies, from syndromic conditions such as Apert and Crouzon syndromes to facial clefts, affect normal growth and development.
Traumatic events in the mature skeleton can displace the normal elements and require repositioning osteotomies if improperly reduced initially. Traumatic events in the developing facial skeleton can disturb normal subsequent growth. Other etiologies that can result in significant dentofacial anomalies include neoplastic growth, surgical resection, and iatrogenic radiation. However, of all the etiologies, developmental anomalies representing the extremes of population norms are the most common conditions requiring orthognathic surgery.
Presentation
A wide range of clinical presentations is possible, some of which are outlined in the table below. Diagnosis is based on a comprehensive assessment that includes clinical examination, skeletal evaluation with standardized radiographs, and dental evaluation with study dental casts addressed as an integral part of the workup.
See the image below.
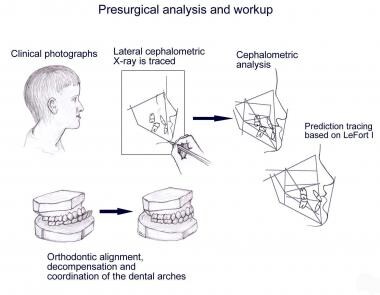 An overview of the clinical, radiographic, and dental evaluation used in planning orthognathic surgery.
Facial balance typically is assessed by dividing the face in thirds. The upper third is from the anterior hairline (trichion) to the glabella, the middle third from the glabella to the subnasale, and the lower third from the subnasale to the menton. When each of the thirds is equal, the face is said to be balanced and of “ideal” proportions. The lower third may be further divided into an upper third (subnasale to oral commissure) and a lower two thirds (oral commissure to menton). Additionally, in profile view the face should have a slight degree of convexity as measured from the glabella to the subnasale to the menton.
See the image below.
 Ideal facial proportions believed to be in aesthetic balance. Such proportions are only guidelines, as ideal proportions change over time, and the ideal result varies with patient expectations.
See the image below.
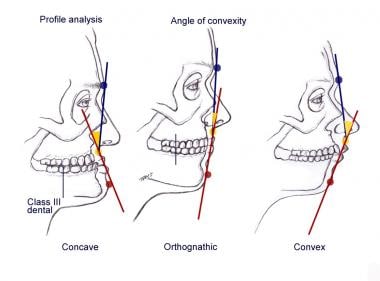 Profile analysis illustrating the degree of facial convexity or concavity from an acceptable orthognathic norm.
Maxillofacial deformities can be divided broadly into 3 major categories: (1) dental dysplasias, (2) skeletal dysplasias, and (3) dentoskeletal dysplasias.
Dental dysplasias
Dental dysplasias are limited strictly to malocclusions that result from abnormal spatial relationship of the dentition and not from the skeletal position of the upper and lower jaws. These can be corrected with orthodontic treatment.
Skeletal dysplasias
In patients with skeletal dysplasia only, the dentition is in good alignment, but the maxilla and/or mandible are dysplastic. Skeletal dysplasias require correcting the skeletal deformity without altering the occlusion. An example is a patient with retrogenia without retrognathia or a patient with hemifacial microsomia who has a normal maxillary-mandibular dental relationship but has an occlusal cant because of skeletal asymmetry.
Dentoskeletal dysplasias
In dentoskeletal dysplasias, the dentition is malpositioned within each arch and with each other; additionally, the skeletal relationship of the upper and lower jaws is abnormal. An example is a patient with a maxillary sagittal and transverse width deficiency from a facial cleft. Correction requires aligning the dentition within each arch with orthodontic treatment and restoring the maxillary-mandibular dental relationship with skeletal osteotomies and repositioning. In addition, dentoskeletal dysplasias can be classified further based on the position in space and on the volume or mass (whether deficient or in excess) of the individual elements. For example, the mandible can be of normal shape and volume but retrognathic in relationship to the maxilla, or it may be both retrognathic and volumetrically deficient.
formity | Clinical Features | Skeletal Assessment | Dental Assessment |
Maxilla: Sagittal deficiency | Concave facial profile Retrusive upper lip Acute nasolabial angle Alar base narrow Lack of dental display | SNA* decreased SNB† normal ANB‡ decreased | Class III Maxillary dental crowding Maxillary incisors proclined Mandibular incisors normal or retroclined |
Maxilla: Sagittal excess | Convex facial profile Obtuse nasolabial angle | SNA increased SNB normal ANB increased | — |
Maxilla: Vertical excess (long face syndrome) | Convex profile Lower facial height increased Alar base constricted Nasolabial angle obtuse Excessive incisor show Excessive gingival show Lip incompetence Mentalis strain with lip closure Chin vertically long, retruded | Lower FH§ increased SNA decreased SNB decreased ANB increased Mandibular plane angle steep Palatal-occlusal plane increased | Class II, Class I Anterior open bite Maxillary arch constricted Curve of Spee, flat-accentuated Dental crowding |
Maxilla: Vertical deficiency (short face syndrome) | Concave facial profile Lower facial height decreased Acute nasolabial angle Alar base widened Lack of incisor show Edentulous appearance Chin protruded | Lower FH decreased SNB increased ANB negative Palatal-occlusal plane decreased Mandibular plane angle acute | Class II, Class I Deep bite Crowding Mandibular dentition Curve of Spee reverse |
Mandible: Deficiency | Convex profile Retruded chin Everted lower lip Deep labiomental crease Mentalis strain with lip closure | SNA normal SNB decreased ANB increased Ar-Gn¶ decreased | Class II Mandibular incisors proclined Maxillary incisors retroclined Curve of Spee accentuated |
Mandible: Excess | Concave profile Midface appears deficient Lower third broad Lower lip thin | SNA normal SNB decreased ANB decreased | Class II Maxillary incisors proclined Mandibular incisors retroclined |
* SNA = Sella-nasion-A point angle
† SNB = Sella-nasion-B point angle
‡ ANB = A point-nasion-B point angle
§ FH = Frankfort horizontal
¶ Ar-Gn = Articulare-gnathion
Indications
Indications for orthognathic surgery include facial dysmorphism with and without functional implications. As an illustration, an osseous genioplasty for a patient with retrogenia but without malocclusion should be considered for facial form. If the retrogenia is associated with retrognathism resulting in a malocclusion, orthognathic surgery is indicated for restoring the facial form and for functional occlusion. Airway and speech are other indications when considering the functional need for orthognathic surgery. Restoration of the normal anatomic relationship between the maxilla and mandible relative to the cranial base reestablishes the functional components (ie, form and function) of the facial skeleton.
Relevant Anatomy
As relevant skeletal and neurovascular anatomy can be found in many anatomic atlases, this section focuses on specific aspects pertinent to the procedures described.
With maxillary osteotomies, an understanding of the vascular blood supply to the mobilized maxilla is crucial. The arterial blood supply to the maxilla is derived from 4 primary sources: (1) the descending palatine branch of the maxillary artery, (2) the ascending palatine branch of the facial artery, (3) the anterior branch of the ascending pharyngeal artery from the external carotid, and (4) the alveolar branches of the maxillary artery. With complete mobilization of the maxilla, frequently the descending palatine vessels are disrupted and the mobilized maxilla derives its vascularity from the remaining sources, primarily the ascending palatine and pharyngeal vessels.
To avoid neurosensory deficits with mandibular osteotomies, the surgeon must be cognizant of the course of the inferior alveolar nerve from its entrance at the mandibular foramen on the medial aspect of the ramus to its emergence from the mental foramen between the first and second premolars. Vertically, the mandibular foramen typically lies approximately 8 mm inferior to the lingula mandibularis (the anterior wall of the mandibular foramen), and the lingula is approximately 5 mm above the occlusal plane. With the sigmoid notch as a reference point, the foramen is approximately 20 mm inferior. Regarding the anterior-to-posterior relationship, the foramen is located 20 mm from the anterior mandibular ramal border, a depth of approximately two thirds of the total mandibular ramal width.
The canal then courses within the mandible, measuring 2-2.5 mm in diameter. Its lowest point from the inferior mandibular border is in the region of the first and second molars, approximately 7.5 mm, before continuing anterior and superior to its emergence from the mental foramen, where it is approximately 8 mm from the inferior border. At the mental foramen, the canal extends caudally before emerging. Regarding the transverse position of the canal within the mandible, it is most superficial in the region of the third molar, approximately 2 mm from the buccal plate. In the region of the first molar, it is 4 mm from the buccal plate.
A number of basic dental concepts pertinent to orthognathic surgical procedures are important.
Dental notation
Universal Dental Notation is the most common system for numerically identifying permanent dentition. The maxillary dentition is numbered sequentially from 1-16 starting with the right maxillary third molar as 1. The numbering system continues from 17-32 beginning with the left mandibular third molar as 17.
Orientation terms
Orientation with respect to intraoral anatomy is referenced to the following terms:
Mesial – Toward the dental mid line
Distal – Away from the dental mid line
Labial – Toward the lips
Buccal – Toward the cheek
Apex – Toward the root tip
Lingual – Toward the tongue
Incisal – Toward the biting surface (anterior dentition)
Occlusal – Toward the biting surface (posterior dentition)
Angulation – Mesiodistal tipping of the long axis of the tooth
Inclination – Labiolingual or buccolingual tipping of the long axis of the tooth
Dental anatomic terms
See the list below:
Cusp – Pronounced elevation on the occlusal surface
Groove – Depression on the occlusal surface
Crown – Visible portion of the tooth covered by enamel
Cingulum – Bulbous convexity of the cervical one third of the lingual surface of anterior dentition
Cervix (neck) – Junction of the crown and root
Root – Portion of the tooth covered by cementum within the alveolar bone
Curvature of the dental arches – Normal reciprocal curvature in the dental arches with the maxilla convex and the mandible concave (allows the dentition maximal contact during function)
Curve of Spee – Normal curvature of the dental arch in the sagittal plane
Curve of Wilson – Normal curvature of the dental arch in the coronal plane
Occlusal classification
The classification of dental occlusions is based on Edward Angle’s observation in 1899 that the key to occlusion is the relationship of the mandibular first molar to the maxillary first molar. [4]
Angle Class I (neutro-occlusion): The mesiobuccal cusp of the maxillary first molar articulates within the mesiobuccal groove of the mandibular first molar.
Angle Class II (disto-occlusion): The mandibular first molar articulates distal to the mesiobuccal cusp of the maxillary first molar. [5]
Angle Class III (mesio-occlusion): The mesiobuccal groove of the mandibular first molar is mesial to the mesiobuccal cusp of the maxillary first molar. [6]
Angle’s original classification has been expanded to include the anterior dentition. Class II is subdivided further to include the angulation of the anterior dentition. In Class II, Division 1, the molar relationship is Class II, but the maxillary anterior teeth are flared labial. In Class II, Division 2, the molar relationship is Class II, but both the maxillary and mandibular anterior teeth are retruded with a deep bite. The terms Class I, II, and III also are used to relate the maxillary and mandibular canine relation.
The Angle classification relates only to maxillary dentition with the mandibular dentition. While it generally is assumed that a similar skeletal relationship of Class I, II, and III follows, this is not always the situation. A Class I molar relationship is possible with a Class II skeletal relationship by dental extractions and orthodontic alignment without regard to basal skeletal morphology.
Upper and lower arch dentition
Additional terms are used to describe the relationship between the dentition of the upper and lower arches.
Overjet – Horizontal distance between the incisal edges of the maxillary incisor to the mandibular incisor
Overbite – Vertical distance between the incisal edge of the maxillary incisor and the mandibular incisor
Crossbite – Lingual-buccal malposition of the normal relationship between the upper and lower dentition (negative overjet)
Deep bite – Condition of excessive overbite
Open bite – Condition of negative overbite (teeth do not meet)
Dental compensations
The anterior dentition typically inclines so as to partly offset the malocclusion and may allow some degree of anterior occlusion to occur depending on the maxillary-mandibular discrepancy. In prognathism, the lower incisors may be flared lingual and the upper incisors flared labial to compensate for the Class III malocclusion. Conversely, with mandibular deficiency the opposite occurs; the mandibular dentition is flared labial and the maxillary dentition flared lingual.
Centric relation and centric occlusion
Centric relation is the most retruded position of the condyle within the glenoid fossa (terminal hinge position). It refers to the condylar-glenoid fossa relation but does not indicate the occlusion. Centric occlusion indicates the maximum intercuspal contact of the dentition and does not refer to the condylar position. In the ideal situation, when the patient is in centric occlusion (maximum), the condylar-glenoid is in proper centric relation.
Contraindications
Numerous risk factors may alter the treatment plan or preclude surgery, including underlying medical conditions, bleeding dyscrasias, systemic disease or local factors that may affect normal wound healing, compromised vascularity of the surgical region, a patient with unrealistic expectations, a noncompliant patient, and patients with poor oral hygiene.
Imaging Studies
Clinical photographs are essential for documentation and to allow for photometric analysis. Use soft-tissue landmarks to obtain angular and linear measurements that can help define the problem quantitatively. Standardize frontal and profile photographs. A clear acetate ruler can be placed next to the patient when the photographs are obtained for reference measurement for magnification; otherwise, a proportionate-type analysis without reliance on absolute values can be used. Images with the lips at repose and during animation (smiling) are obtained; the degree of dental display is noted for each.
Skeletal evaluation typically includes radiographic evaluation with ortho–Panorex and cephalometric x-rays.
Ortho–Panorex x-rays provide an overview of the stage of dental development, the mandibular anatomy, and gross pathology. Specific films such as occlusal and periapical views can be obtained to further assess the dentition, supporting bone, and interdental spaces.
Cephalometric x-rays provide for standardized skull and/or facial views that allow for comparison over time to assess growth in an individual and for comparison of that individual against standardized population norms.
Skeletal views can be obtained in lateral and frontal views.
Lateral cephalometric x-ray allows for assessment of the elements of the dentofacial skeleton from a sagittal perspective. See the image below.
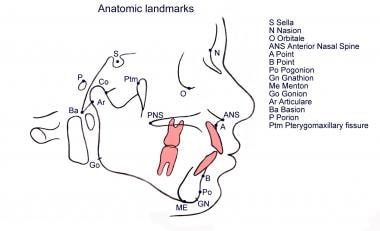
 Analysis of the dentofacial skeleton is based on identifiable radiographic landmarks on a lateral cephalometric x-ray.
With lateral cephalometric x-ray, the maxilla can be related to the mandible and each related to their position in the skull base. Simultaneously, the soft-tissue profile can be related to the facial skeleton. See the image below.
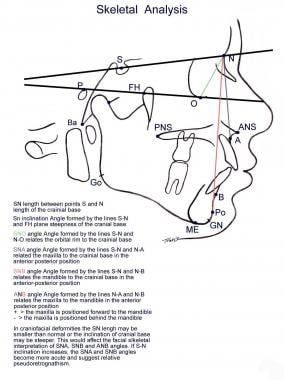 Lateral cephalometric analysis of the facial skeleton based on Steiner analysis. The positions of the maxilla and mandible each are related spatially to the anterior cranial base and to each other. Note that normative values of the facial elements depend on a normal anterior cranial base inclination and length, which typically are altered in craniofacial conditions.
Lateral cephalometric x-ray also allows the dentition to be related to each other, and each can be related to its own skeletal base, the maxilla, and the mandible. See the image below.
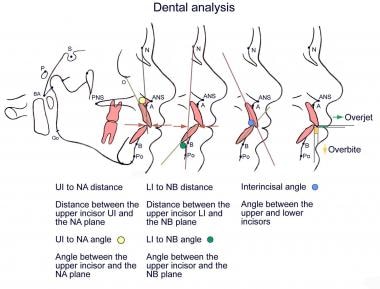 Lateral cephalometric analysis of the dentition within the skeletal framework.
Frontal cephalometric x-ray allows for assessment of the degree of facial asymmetry.
Obtain quantitative measurements based on key anatomic landmarks (cephalometric analysis). Numerous cephalometric analyses exist, each emphasizing particular skeletal and dental elements. Common analyses include Steiner, Ricketts, and Delaire and are beyond the scope of this overview. For the surgeon, the analysis must be clinically workable, simple to use, and directly relatable to the skeletal elements that can be repositioned. While the analysis is invaluable, do not focus the treatment plan solely on correcting cephalometric abnormalities.
Additional radiographs include the following:
Periapical films are obtained to determine if sufficient space exists for interdental osteotomies.
On occasion, hand wrist films are useful to help determine skeletal age based on the known timing of sequential closure of the epiphyseal growth plates. However, typically facial skeletal maturity is determined by comparison of serial lateral cephalometric films obtained at 6-month intervals.
Three-dimensional computerized tomography (3DCT) is increasingly being used for surgical evaluation and planning in academic settings. Preoperative planning using 3DCT offers multiple potential advantages, including the ability to easily consider multiple different surgical approaches to a problem and the ability to characterize degree and direction of skeletal movement at any point over the osteotomized segment (as opposed to only the occlusal level). With advancing technology, such 3D visualization of the patient’s anatomic deformity is likely to replace today’s conventional 2D cephalometric analysis.
Dental models
Surgical movement of maxilla and mandible inherently alter the maxillary-mandibular dental occlusion, and as such, careful analysis of the dental models with the orthodontist is essential. The maxillary dental and mandibular dental casts can be studied individually and hand manipulated with each other to assess how the arches are coordinated.
Assessment of the models includes space analysis and arch length, transverse width discrepancies, position of the individual tooth within its own arch, and the relationship of the maxillary dentition to the mandibular dentition.
Establish the diagnosis from a working problem list generated from the clinical and photographic evaluation, cephalometric analysis, and study dental models.
Orthognathic Surgery Treatment & Management
Surgical Therapy
The elements of the facial skeleton can be repositioned, redefining the face through a variety of well-established osteotomies, including Le Fort I-type osteotomy, Le Fort II-type osteotomy, Le Fort III-type osteotomy, maxillary segmental osteotomies, sagittal split osteotomy of the mandibular ramus, vertical ramal osteotomy, inverted L and C osteotomies, mandibular body segmental osteotomies, and mandibular symphysis osteotomies.
Most maxillofacial deformities can be managed with 3 basic osteotomies: the mid face with the Le Fort I-type osteotomy, the lower face with the sagittal split ramal osteotomy of the mandible, and the horizontal osteotomy of the symphysis of the chin.
Mid face
Various osteotomies are used to correct midfacial deformities, and the choice of procedure depends on the specific deformity. The Le Fort osteotomies are named after the 3 classic lines of weakness of the facial skeleton described by Rene Le Fort in 1901. (For more information, see Facial Trauma, Maxillary and Le Fort Fractures.) Complete craniofacial dysjunction by the Le Fort III osteotomy allows the surgeon to alter the orbital position and volume, zygomatic projection, position of the nasal root, frontonasal angle, and position of the maxilla and to lengthen the nose. The Le Fort II osteotomy allows the surgeon to alter the nasomaxillary projection without altering the orbital volume and zygomatic projection. The Le Fort I osteotomy allows for correction primarily at the occlusal level affecting the upper lip position, nasal tip and alar base region, and the columella labial angle without altering the orbitozygomatic region.
Nevertheless, remember that these standard Le Fort osteotomies frequently must be modified to address the specific clinical situation. [7] For example, modify the standard Le Fort I osteotomy to include a portion of the body of the zygoma when the lower maxillary deficiency is accompanied by inadequate zygomatic projection but the orbit does not require alteration as it does in a Le Fort III. A modified, high Le Fort I osteotomy is often used when performing midfacial advancement for patients with cleft lip and palate. In addition to providing more malar projection, a downward sloping osteotomy elongates the nasolabial region, which is frequently short in the patient with a cleft. The Le Fort II and III osteotomies generally are part of the treatment plan in the major craniofacial dysotosis syndromes and are described elsewhere. For most midfacial maxillofacial deformities, the Le Fort I osteotomy and its variations are adequate.
Lower face
For the lower face, various osteotomies are used to correct mandibular deformities, and the choice depends on the particular deformity. Currently, the sagittal split ramal osteotomy is the primary choice for correcting most cases of mandibular retrognathism and prognathism. In extreme cases of mandibular prognathism, some surgeons prefer the intraoral vertical osteotomy or the inverted L osteotomy. In situations of mandibular advancement in which the mandibular rami is hypoplastic and cannot be sagittally split, the inverted L and the C osteotomy with bone grafts are preferred. Deformities of the chin can exist independently of mandibular deformities, and the chin can be abnormally proportioned without occlusal involvement.
While alloplastic chin implants are used most commonly for correction of minimal sagittal chin deficiencies, the horizontal osteotomy of the symphysis (osseous genioplasty) is a far more versatile procedure. The chin can be repositioned in multiple planes, allowing for correction of significant sagittal and vertical deformities of deficiency (microgenia) or excess (macrogenia) and asymmetric conditions.
Preoperative Details
Begin treatment planning by reviewing the various orthodontic and surgical options that address the problem list. Primarily, decide whether the deformity is significant enough to require surgical repositioning or if orthodontic alignment of the dentition can be achieved without significantly compromising facial aesthetics. If contemplating surgical intervention, the question arises whether to intervene prior to completion of skeletal growth or to await skeletal maturity to eliminate the variability of subsequent growth and the need for further surgical intervention.
Once the decision is made for combined dental-surgical correction, carefully plan the overall treatment based on comprehensive assessment that includes clinical examination, skeletal evaluation with standardized radiographs, and dental evaluation with study dental casts addressed as an integral part of the workup. See the image below.
An overview of the clinical, radiographic, and dental evaluation used in planning orthognathic surgery.The management can then be divided into the following 5 phases:
Preorthodontic preparatory phase
Presurgical orthodontic treatment phase
Surgical phase
Postsurgical orthodontic phase
Prosthodontic treatment phase
Preorthodontic preparatory phase
Prior to the formal start of the presurgical orthodontic treatment phase, treat acute periodontal disease and caries as part of phase 1. Reduce gingival inflammation with cleaning and good oral hygiene. Treat poorly attached gingiva prior to orthodontic tooth movement. Decide whether caried dentition can be restored either temporarily or permanently and whether endodontic treatment or extraction is required.
Presurgical orthodontic treatment phase
Once the state of oral hygiene is maximized, the presurgical orthodontic treatment phase can begin. Initially, decide whether any dentition requires extraction. This depends on the incisor positions and the degree of dental crowding within a limited arch length. Sufficient space must be present to allow the dentition to be placed within the supporting basal bone. Instead of extractions, expansion of the arch may be the ideal choice. If the midpalatal suture is open, expansion may be accomplished orthodontically with a palatal expansion device; otherwise, this may require surgical assistance with an osteotomy. Extractions also may be required to allow for maximum skeletal repositioning to improve final facial esthetics. If a mandibular osteotomy such as a sagittal split is contemplated, extracting the mandibular third molars well in advance, typically 8-12 months prior, generally is wise to minimize the risk of an unfavorable osteotomy and to allow for rigid internal fixation.
During this phase, orthodontically align the dentition within the dental arch, level the curve of Spee, and decompensate the anterior dentition. The images below.
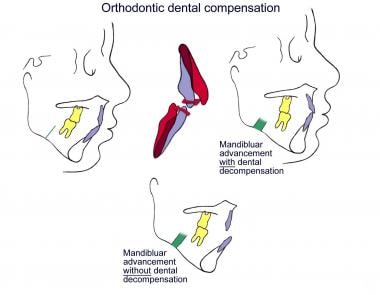 Illustration of the role of presurgical dental decompensation in a patient requiring mandibular advancement. Dental decompensation is necessary to allow for proper degree of mandibular advancement and for postsurgical stability at the occlusal level. Note that the occlusion is made worse until corrected by skeletal advancement.
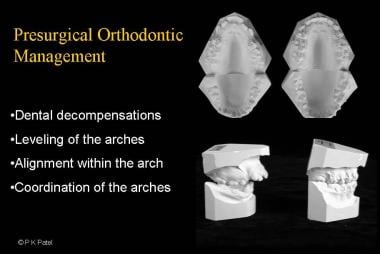 Presurgical orthodontic management requires appropriate dental decompensation, alignment of the dentition within the individual arches, leveling of the curve of Spee, and coordination of the maxillary and mandibular dentition for postoperative stability.
This is performed independently within each of the dental arches without any attempt at correcting the occlusion. Because of this, malocclusion frequently is worsened; inform the patient of this. However, the maxillary and mandibular dentitions are coordinated with each other as if the surgery had been accomplished with dental casts that can be manipulated freely.
Obtain progress dental models throughout the orthodontic treatment, and begin planning for surgery when they can be hand coordinated with stable occlusion. If segmental osteotomies are planned, then prepare the dentition accordingly. If osteotomies are not placed through the planned extraction sites, then prepare interdental space orthodontically, with the roots widely divergent to prevent injury and the space favorably closed at the time of surgery. Use periapical and ortho–Panorex films to evaluate the space for osteotomies. Segmental dental casts then confirm the readiness for surgery. The orthodontist then typically replaces the arch wire with a heavy rectangular wire ligated to the orthodontic brackets and surgical hooks to permit intraoperative and postoperative maxillary-mandibular fixation.
At the time of surgery, no active dental movement should be occurring, with the orthodontic wire passive. If segmental osteotomies are planned, likewise segment the arch wire prior to surgery. This presurgical phase typically varies from 6-18 months depending on what needs to be accomplished to maximize final surgical stability at the occlusal level.
Surgical phase
Begin surgical planning by clinically re-evaluating the patient. Orthodontic movement of dentition alone alters facial features in a subtle manner (eg, amount of dental display); take this into account when planning skeletal movement. Typically, obtain radiographic studies within 2–3 weeks of the planned surgical date. Obtain and analyze a presurgical cephalometric film and make prediction tracings. Then mount the models on a semiadjustable articulator to simulate the relative position of the dentition within the facial form. Based on the clinical assessment and cephalometric prediction tracings, perform a model surgery to simulate the planned operative procedures.
With the dental casts in their final position, make an acrylic splint. When repositioning of both jaws is planned, fabricate an intermediate splint in addition to the final splint. These splints allow for accurate intraoperative positioning of the maxilla and mandibular dentoalveolar segments. In addition, these splints are important to ensure postoperative stability when the maxillary and mandibular arches are insufficiently coordinated for maximum interdigitation. The details of prediction tracing, model surgery, and splint fabrication are beyond the scope of this overview article.
Intraoperative Details
The sequence of operative procedures is based on the preoperative planning and model surgery. If a single jaw is being repositioned, use a final splint to guide the occlusion of the jaw being moved relative to the remaining jaw. If both maxillary and mandibular repositioning osteotomies are planned, use an intermediate splint to guide the movement of one jaw relative to the other jaw. While typically the maxilla is repositioned first, followed by the mandible, the sequence can be reversed with the appropriate intermediate splint. Reposition the remaining jaw based on the final splint. Once the maxilla and mandible are in their final positions, assess the chin and perform an osseous genioplasty if necessary.
Le Fort I operative details
See the image below.
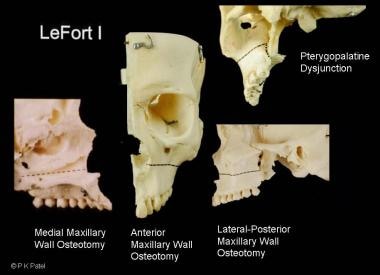 Illustration of the transverse maxillary Le Fort I osteotomy. The osteotomy is made with a reciprocating saw and completed at the pterygopalatine junction with a curved osteotome.
See the list below:
Make an external reference mark by tattooing the medial canthus with methylene blue dye, and measure the vertical distance to the maxillary arch wire by the lateral incisor. (Alternatively, some surgeons prefer to place a K wire at the nasion or to use an internal bony reference mark with a drill hole prior to the osteotomy.) Use this measurement to position the maxilla vertically.
Accomplish exposure to the midfacial skeleton through an intraoral labiobuccal incision above the attached gingiva from first molar to first molar, leaving an adequate mucosal edge to facilitate final closure.
Direct the subperiosteal dissection superiorly, exposing the anterior maxillary wall, identifying the inferior orbital foramen, and exposing the lateral zygomatic-maxillary buttress, the body of the zygoma, and the anterior portion of the zygomatic arch. Note that the superior exposure must be sufficient to accommodate the fixation plates. Continue the dissection posteriorly to the pterygopalatine region. Direct dissection medially to expose the nasomaxillary buttress, the pyriform aperture, and the anterior nasal spine. Perform the intranasal dissection, exposing the nasal floor, the lateral nasal wall below the inferior turbinate, and medially, the septum and vomer. Continue the dissection posteriorly to the junction of the hard and soft palate.
With skeletal exposure complete, mark the planned osteotomy, noting the tooth root apices and the infraorbital foramen. Because the standard Le Fort osteotomy has a number of variations, tailor the osteotomy to the individual patient. Use a reciprocating saw to complete the horizontal maxillary osteotomies, proceeding from the lateral nasal wall across the anterior maxillary wall and through the posterior-lateral maxillary wall. If needed, the reciprocating saw can be redirected from lateral to medial to facilitate completion of the osteotomy.
Separate the nasal septum and vomer from the maxillary crest with a septal osteotome directed downward and posterior. Alternately, the septal osteotomy can be accomplished with a reciprocating saw that is directed away from the side with nasal intubation to avoid transecting the nasotracheal tube.
Finally, use a curved osteotome to separate the pterygoid plate from the maxillary tuberosity. Position the pterygopalatine dysjunction osteotome parallel to the occlusal plane and below the maxillary osteotomy to avoid injuring the internal maxillary artery. A finger placed behind the maxillary tuberosity easily can verify the separation. Note that some surgeons prefer to use an oscillating saw instead of the osteotome.
Once the osteotomy is completed, down-fracture the maxilla. This typically can be performed with digital pressure by placing the thumbs at the base of the pyriform aperture. If significant resistance is met, revisiting the osteotomy sites with the reciprocating saw and an osteotome is preferable to immediately proceeding with Rowe disimpaction forceps. Using significant force to accomplish the down-fracture can lead to unfavorable fractures. The areas that typically are incomplete are the posterior aspect of the lateral nasal walls and the pterygopalatine dysjunction.
As the maxilla is mobilized inferiorly, simultaneously elevate any adherent nasal floor mucosa. Once the down-fracture is completed, mobilize the maxilla from side to side and then anteriorly in the sagittal direction with the aid of Tessier retromaxillary levers or Rowe forceps. Digitally release any adherent soft tissue from the posterior aspect behind the tuberosity. Completely mobilize the maxilla to passively place it in its final position with a pair of forceps.
With the maxilla down-fractured and mobilized, ligate a prefabricated occlusal splint to the maxillary arch wire and place the maxilla and mandible in maxillary-mandibular fixation either with wire or dental elastics. Allow the maxillary-mandibular complex to rotate within its arc of rotation with the mandibular condyle seated in its glenoid fossa. Bring the maxilla into the desired anterior vertical position based on the amount of dental display desired as determined from the preoperative analysis. Confirm this by vertical measurement from the previously marked reference point.
As the maxilla is brought into the appropriate position, areas of interferences occur that require selective removal of bone at points of impaction and the nasal septum to prevent septal buckling. With the maxilla in the desired position, stabilize it with plates and screws at the medial and lateral buttresses. Release the maxillary-mandibular fixation and verify the occlusion in that the mandible passively closes directly into the splint without repositioning. If suspicion exists that the condyle was not seated properly at the time of fixation, redo the osteosynthesis. If significant inferior maxillary repositioning is present, use either autogenous bone or alloplastic hydroxyapatite for interpositional buttress grafts.
Once the maxilla is fixed rigidly and the occlusion is satisfactory, decide whether any of the bony gaps are of significant size to require bone grafts to minimize relapse. The authors’ indication for bone graft is the presence of any vertical defect 5 mm or greater. The authors’ preference is autogenous bone, either a corticocancellous block of bone from the inner table of the iliac crest or a split outer table calvarial bone, depending on the size of the defect. The block of iliac bone is set into place as an interpositional graft as a half-lap joint. The cortical component is fixed into place with lag screws. Alternatively, hydroxyapatite blocks can be used for minimal-sized bony gaps.
Fix the septum mid line and place an alar cinch suture for wide flaring ala if necessary. When closing the vestibular incision, cheiloplasty with a V-Y advancement or any number of variations can be considered.
Sagittal split osteotomy of the mandibular ramus
See the image below.
 Illustration of the sagittal split ramal osteotomy. Place the horizontal osteotomy superior to the inferior alveolar nerve foramen and continue partially through the body along the oblique line to the region of the second and first molar to complete the vertical osteotomy. Make the osteotomy through the cortex with a reciprocating saw and complete it with an osteotome along the buccal surface.
See the list below:
Palpate the ascending ramus and place the mucovestibular incision well lateral to the posterior dentition to allow for an adequate medial mucosal edge for final closure. The incision typically begins approximately 1-2 cm above the occlusal plane and continues to the region of the first molar.
Continue the incision through the periosteum, exposing the lateral border of the posterior body, angle, and ascending ramus. Expose the inferior mandibular border with an inferior border stripper so that a channel retractor can be placed easily. Partially strip the anterior ramal border of the temporalis muscle and place a retractor superiorly onto the coronoid process. Elevate the medial portion of the ramus with a curved periosteal elevator beginning well above the occlusal plane, proceeding from superior to inferior, to safely reflect medially the inferior alveolar neurovascular bundle. In elevating the medial ramus, take precautions to remain subperiosteal and to recall the anatomic topography with the lingula and the relationship of the mandibular foramen.
With exposure complete, place a medial ramus retractor or a curved elevator to protect the neurovascular bundle. Make the horizontal osteotomy of the medial ramus first either with a Lindemann side-cutting burr or with a reciprocating saw starting well above and posterior to the mandibular foramen. Deepen the osteotomy to approximately one half of the thickness of the ramus and obliquely, so that it can be continued inferiorly. Use a reciprocating saw to continue the osteotomy laterally along the external oblique ridge to the region between the first and second molar. The tip of the saw should penetrate only the anterior cortex; place the osteotomy as lateral as possible to protect the nerve. Reposition the saw to make the vertical osteotomy through the buccal cortex, typically between the second and first molar. Take precautions to ensure that the vertical osteotomy continues through the inferior mandibular border to the medial lingual cortex.
Complete the remainder of the osteotomy with a series of osteotomes beginning from mesial to distal, approaching the horizontal osteotomy of the mandible. Direct the osteotomes laterally toward the buccal cortex to avoid transecting the inferior alveolar nerve. A 3-point–type spreader can be placed to begin the separation, and it can be completed with an osteotome at points of resistance. The course of the inferior alveolar nerve should be entirely within the distal tooth-bearing segment. If it is not, mobilize the nerve from the proximal segment. Complete the separation so that the mesial tooth-bearing segment moves independent of the distal condylar segment and can be repositioned into final occlusion with little resistance. Then, perform the osteotomy on the contralateral side.
Place the mesial (distal) tooth-bearing segment in maxillary-mandibular fixation with a prefabricated occlusal splint ligated to the maxillary arch wire. Seat the condylar distal (proximal) segment within the glenoid fossa. Obtain fixation typically by placing 3 bicortical screws in an inverted L pattern or with an inferior border monocortical plate and a single positional bicortical screw. Fixation can be entirely transoral with a contra-angle drill and screwdriver system or a transbuccal trocar approach. The bicortical screws are positional screws used to loosely approximate the bony segments, not lag screws. If the screws are tightened down, the proximal segment may be displaced laterally out of the glenoid fossa, risking a crush injury to the nerve. Release the maxillary-mandibular fixation and check the occlusion. If the occlusion is unacceptable, remove the fixation and reposition the segments. If the occlusion is satisfactory, close the wounds with sutures.
Osseous genioplasty [8]
Make a labial mucosa incision, typically from canine to canine, well above the attached gingiva to allow for closure. Partially transect the mentalis muscle from its insertion and perform a subperiosteal dissection. Limit the extent of the dissection over the pogonion and continue the dissection laterally below the mental foramen and as far lateral as possible to the inferior mandibular border in the region of the second premolar and first molar.
With exposure complete, mark the osteotomy a minimum of 5 mm below the tooth root apices and similarly below the mental foramen, recalling that canine length is approximately 30 mm and the mental foramen extends caudally prior to its emergence. The osteotomy can be varied depending on the deformity and the planned correction. Score the mid line with an oscillating saw and make the symphyseal osteotomy with a reciprocating saw. If a double osteotomy is planned either for a step advancement or a wedge resection, make the distal or inferiorly marked osteotomy first. Take care to complete the lateral inferior border osteotomies with the reciprocating saw. The inferior segment should separate easily if the osteotomy is complete.
Mobilize the inferior pedicled osseous segment to the desired position and fix it with plates and screws. A step deformity typically is palpable at the inferior border mandibular osteotomy sites. While the deformity becomes less significant with remodeling, it can be contoured with a guarded rasp.
Close the wound by approximating the mentalis muscle and the overlying mucosa.
Caveats to orthognathic surgery in patients with cleft lip and palate
As a result of early surgical procedures, patients with cleft lip and palate often develop malocclusion associated with maxillary hypoplasia. Depending on the literature, about 25% of such patients will later benefit from orthognathic surgery to correct both the occlusion and to reestablish a more anatomic harmony between the upper, middle, and lower face. While most of the above discussion applies to patients with clefts and associated dentofacial deformity, several salient points are unique to this group of patients.
Significant maxillary hypoplasia may give the false impression of mandibular prognathism. The surgeon and orthodontist must carefully consider the preoperative clinical findings and cephalometric studies when planning the procedure. The primary procedure in patients with clefts is the Le Fort I advancement, often with modification to include a portion of the zygomatic body. The need to combine this with mandibular setback is more common.
See the image below.
 Variation of midfacial osteotomies to correct differing degrees of midfacial deformities involving the zygoma.
As in noncleft patients, cleft orthognathic surgery is generally performed after the patient has reached facial skeletal maturity, unless earlier orthognathic surgery is likely to alleviate significant functional or psychologic deficits.
By the teenage years, many patients with clefts have undergone adequate alveolar bone grafting, in which bone has been placed across the alveolar portion of the cleft so as to bridge the cleft and unify the maxilla into a single stable piece. In such patients, the surgical exposure and Le Fort I osteotomy can be performed as described above. For patients who have undergone ineffective or no bone graft, an alternative approach to Le Fort I may be performed whereby both segments of the maxilla are repositioned, oronasal fistula(e) are closed, and bone graft is placed at the time of orthognathic surgery. Here the upper gingivobuccalmucosal incision is modified to allow closure of the nasal floor and the palatal defect.
Postoperative Details
Airway management is of primary concern in the immediate postoperative period, and patients require close monitoring. Obtain an ortho–Panorex view in the early postoperative period to confirm that the condyles are in their appropriate position. If the condyles are displaced, return the patient to surgery and redo the osteosynthesis.
Postoperative surgical practices vary depending on surgeon preferences and the stability believed to be obtained at the time of surgery. This varies from maintenance of maxillary-mandibular fixation with wire to use of only guiding dental elastics for a varying period of 4–8 weeks. Provide close follow-up care to the patient. If the occlusion changes, elastics can be applied in the appropriate vector to guide the occlusion until bony healing is complete. During this period, advance the patient from an early liquid diet to a mechanically soft diet to minimize significant occlusal forces.
Postsurgical orthodontic phase
The postsurgical orthodontic phase typically begins 4–8 weeks after surgery. If used, remove the surgical splint and instruct the patient in increasing the maxillary-mandibular range of motion (limited up until this point) and in gradually returning to his or her usual diet. Return the patient to the orthodontist for finishing dental alignment with the relative position of the skeletal bases in their final position. Close any remaining interdental spaces and bring the dentition into maximum intercuspal relationship. This phase typically lasts for approximately 4–6 months and formally ends with the removal of the orthodontic braces; instruct the patient to use a retainer to maintain long-term stability. Obtain photographs, radiographic studies, and dental models at debanding of the orthodontic braces and at 1 year postoperatively.
Prosthodontic treatment phase
The final phase includes placement of dental implants, prosthetic and periodontal treatment, and dental restoration to improve the final dental esthetics.
Outcome and Prognosis
Outcome depends on the surgical procedure, on a multitude of factors that begin long before the actual surgery, and on control of the variables long after the surgical procedure. Whether the desired long-term outcome is achieved in terms of occlusal function and esthetics of the facial form depends on whether the goals of each of the treatment phases were achieved.
See the images below.
 Illustration of mandibular excess. The patient underwent bilateral sagittal split ramal osteotomy and mandibular setback.
 Illustration of mandibular deficiency. The patient underwent bilateral sagittal split ramal osteotomy and advancement.
 Illustration of maxillary deficiency with relative mandibular excess. The patient underwent a modified Le Fort I midfacial advancement that included the body of the zygoma.
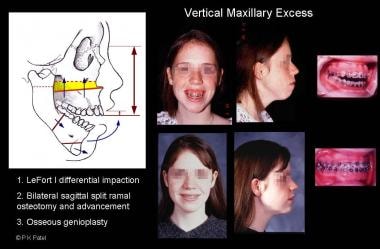 Illustration of vertical maxillary excess, apertognathia, and mandibular retrognathia. The patient underwent Le Fort I anterior-posterior differential maxillary impaction with sagittal split ramal osteotomy and mandibular advancement.
Moreover, the success of each phase depends on the preceding phase of treatment. For example, inadequate incisor decompensation limits the amount of sagittal repositioning possible and compromises final facial esthetics. If mobilization of the maxilla at the time of surgery is inadequate, obtaining a less-than-ideal occlusal relation, the postsurgical orthodontic phase is prolonged and the likelihood of relapse increased.
With any skeletal movement, the surgeon always must be aware of the potential for relapse even in the most ideal situation and with the use of rigid internal fixation. Soft-tissue forces directed against the vector of the surgical movement are significant. Generally, the most stable moves are superior and posterior maxillary impactions and mandibular setback. Advancements of the maxilla, whether vertically or sagittally, are inherently less stable, as is mandibular advancement.
Although orthognathic surgery involves restoring the skeletal anatomy, the patient ultimately is concerned with how the soft tissue drapes the new facial skeleton. The surgeon must be well aware of the soft-tissue response to skeletal movements. The goal is not necessarily to normalize cephalometric values; rather, the aim should be for the patient to have normal appearance and function.
In cleft orthognathic surgery, plain film radiographs (occlusal and periapical) and CT are helpful in preoperatively determining the adequacy of bone across a previously bone-grafted alveolar cleft.
Other Tests.
- : public
